donderdag 24 augustus 2023

Orange (Belgium) DynDNS

The Orange router only accepts an email address. If you try to enter a username, you get this error:


It is a JavaScript function doing a check. You can change this function and load it using Chrome "Overrides" to avoid this error.

An easier way is to change the POST request. I'll explain how you can do this (on Windows):

Using Chrome (Firefox has a build-in method, see below):

Open Chrome and go to the "Dynamic DNS" router page. Press F12 to open the "Developer tools" and choose "Network":

Now you can fill your information in the form and use a fake email address:


Submit this form. You will get this notification: The username or password specified is incorrect. The return code is: (badauth)

In the Developer tools, you should see the file "OrgDynDns". Right click the file and choose "Copy" -> "Copy as cURL (cmd)":


Open "Notepad" or any other text editor and paste the text:

Replace fake.address^%^40test.com by your real username. I also had to remove the line "  --compressed ^". Now copy all this text again, open a command line (Windows start button and type CMD + Enter). Paste the text here and press Enter:


You're done!! Go to Chrome and refresh the page. You should see your DynDNS name updated successfully:


Using Firefox:

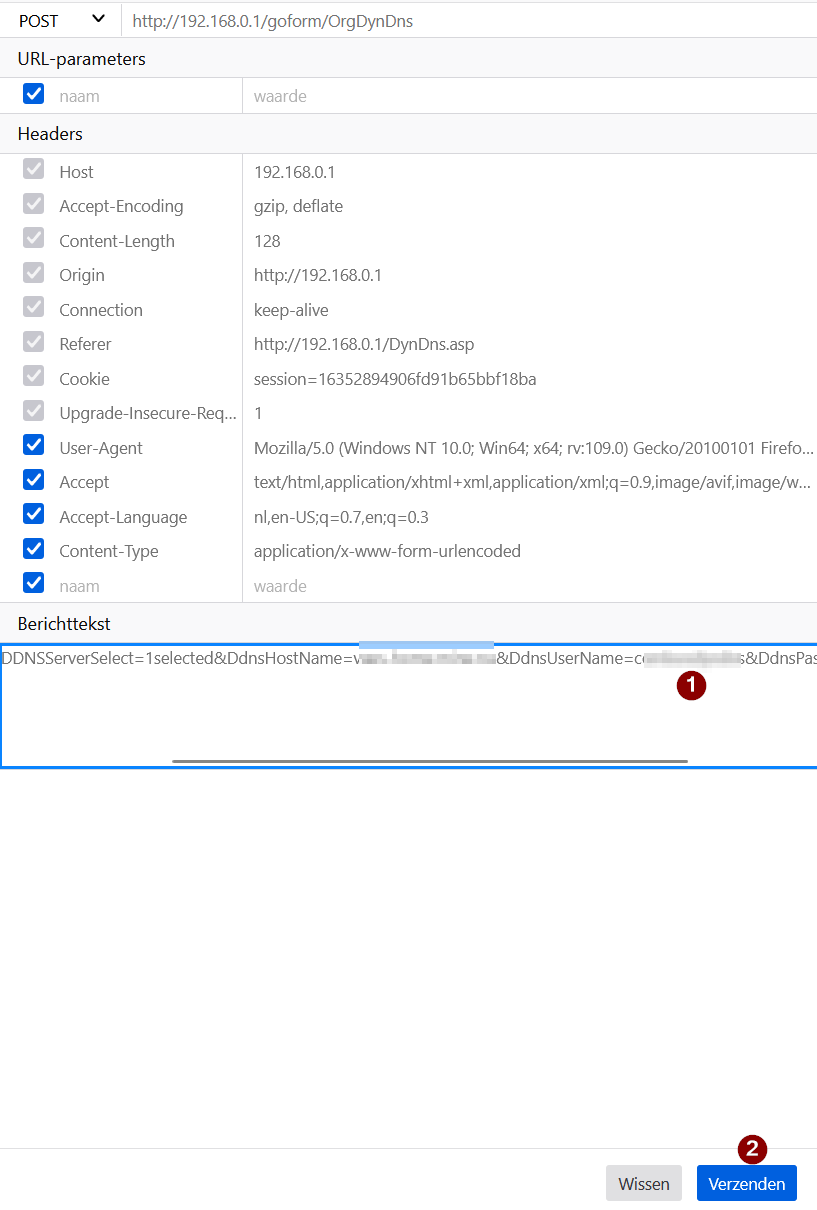
Open Firefox, go to the "Dynamic DNS" page of your router. Press F12 to open Developer Tools. Fill out the form with a fake email address (see above). Right click on "OrgDynDns" and choose to "Edit and resend":


Now change the username and send:


If all went well, refresh the page, the service should be activated!


dinsdag 31 januari 2023

Veeam email notification Microsoft Exchange Online / Microsoft 365

Setting up email notifications for Veeam Backup & Replication is not obvious.

And if you use Veeam Windows Agent to backup, it is even different.


Let me show you some possibilities for both:

First method, using "smtp.office365.com"

If you are using MFA, create an app password. Direct link: https://mysignins.microsoft.com/security-info


Click on "Add sign-in method" and create an "App password".

As an admin, check in the "Microsoft 365 admin center" the details of this user -> Mail -> Email apps

Make sure "Authenticated SMTP" is checked.


In Veeam Backup & Replication, you can set it up like this:


Put your M365 username/password in "1"

The "From" address can be put in "2". You can use your main address or:

-    address of a distribution list (make sure you have "send as" permission)

-    address of a shared mailbox (you also need "send as" permission)

-    address of an alias (allow it in Exchange Admin Center -> settings -> Mail flow)

The "To" should contain the recipient "3". You can also use a distribution list here.


In Veeam Agent for Microsoft Windows (Free):

Go to the settings -> enable email notifications -> click on "Configure and test".

Click on "Show SMTP server settings":


The email address in "1" is the "From" and the "To" address!

The email address in "2" is the username, linked to the password in "3" (above)

I usually use a distribution list in "1". This way all members from that list will receive the message. Make sure the username in "2" has "send as" permissions.


If you setup any of the 2 in a network with a fixed WAN IP and with access to any TCP port 25, I mostly use Microsoft Direct Send.

Put your IP address in the SPF record. Use your MX record as SMTP server (port 25). No login credentials. You can only send to internal addresses, so use a distribution list to relay it to external ones.

dinsdag 31 maart 2020

ING Home'Bank/Business'Bank Timeout killer (Belgium)


I use ING's Home'Bank Offline (Belgium). Recently the bank decided to stop using this offline program. It hasn't been updated since 2014.
People must switch to the online version. I don't like it as much. The offline tool is a lot faster and you can use it all day long, without being kicked off. A code from their card reader is necessary to transmit the payments or to get an update of your accounts.

The main frustration with their online bank software is de idle timeout. The session expires after less than 4 minutes being idle. This way, you cannot use this professionally. You have to login again with the card reader or the "itsme" app.
But they display a message before disconnecting you:


Within 60 seconds, you can extend your session if you see this message coming up. Bad luck if you don't have the page visible at that moment.

So, I decided to do something about it. A small Google Chrome extension can click automatically on the "Yes" to extend the session.

Looking in the site's JavaScript code I see this:

 
b.querySelector(".k2-session-timeout-dialog-yes-button").addEventListener("click", function() {
    ING.K2.dialog.call(b, "close"),
    ING.Session.extend()
 

When the "Yes" button is clicked they call the function: ING.Session.extend()

Let's start.
Create a new directory and add "manifest.json" in it:

 {
  "manifest_version": 2,

  "name": "ING Timeout killer",
  "description": "This extension will keep your ING (BE) session alive",
  "version": "1.0",
  "icons":
  {
      "16": "icon16.png",
      "48": "icon48.png",
      "128": "icon128.png"
  },  
  "content_scripts":
  [
      {
          "matches":
          [
              "https://ebanking.ing.be/*"
          ],
          "js":
          [
              "script.js"
          ],
          "run_at":  "document_idle",
          "all_frames": true
      }
  ],


  "browser_action": {
   "default_icon": "icon16.png",
   "default_popup": "popup.html"
  },
    "permissions":
    [
        "https://ebanking.ing.be/*",
        "tabs",
        "notifications"
    ]
}

Create your own icons, or use mine: ING-TimeoutKiller-icons.zip

Create "popup.html":

<!doctype html>
<html>
  <head>
    <title>ING timeout killer</title>
  </head>
  <body>
    <h1>ING timeout killer</h1>
  </body>
</html>  

And the last one "script.js":

console.log("ING timeout killer extension loaded!")
setInterval(function () {
    // Invoke function every minute
 location.href="javascript:ING.Session.extend(); void 0";
  }, 60000);

This calls their "Extend" function every 60 seconds.

In Chrome you go to: chrome://extensions/
Turn on "Developer mode" (top right) and load the directory with the files by clicking on "Load unpacked".

That's it. Login to your bank account and wait...

It's seems that after a much longer time the session will expire after all. Perhaps a page reload will solve that. If it bothers me, I'll search for it.

Buy me a beer if you like this. Good luck!

vrijdag 15 november 2019

Exact Online - Python - REST API

Recently I was asked to make a local application to import contacts from a CSV file to Exact Online. This should run automatically whenever a new CSV is available.
Python (2.7) is the language I wanted to use.
A library is available (https://github.com/ossobv/exactonline), but I needed some time to implement the OAuth2.
No real examples are available, so I decided to make a step by step tutorial.

Go to the Exact Online Developers site: https://www.exact.com/benl/developers
Click on "Exact Online Partners" to create a free account:


Now go to the App center and login: https://apps.exactonline.com/be/nl-BE/V2

At the top, right side, you can click on "Mijn Apps beheren" (Control my apps).
Now create a new "Test-App":


Give a name and set the Redirect URI to: https://app.getpostman.com/oauth2/callback (I will get back to this later on):


Click register and find the authorization data:


You need the "Client ID" and "Client Secret" later on.

Now you need to create an access token. You might be able to do this with your webserver, but I used another easy solution:
Install Postman on your computer: https://www.getpostman.com/
Create a new request:


Now choose "Authorization" -> type: "OAuth 2.0" -> "Get New Access Token":


Fill out the fields in the form. "Client ID" and "Client Secret" are the ones you created before. All other fields should be the same (unless you're not in Belgium: exactonline.be):


When you click "Request Token", you will be directed to the login screen of Exact Online. Use the developer credentials you created earlier:


Postman will show you the "Tokens" now:


The tokens will expire after one hour. You can make new ones if this should happen.

Now it's Python time. Install the ExactOnline library: pip install exactonline
We need to setup the configuration in the INI file. An example is included in the library:
exactonline/exactonline/storage/ini_example.ini


 [server]  
 auth_url = https://start.exactonline.co.uk/api/oauth2/auth  
 rest_url = https://start.exactonline.co.uk/api  
 token_url = https://start.exactonline.co.uk/api/oauth2/token  
   
 [application]  
 base_url = https://example.com  
 client_id = {12345678-abcd-1234-abcd-0123456789ab}  
 client_secret = ZZZ999xxx000  
 iteration_limit = 50  
   
 [transient]  
 access_expiry = 1426492503  
 access_token = dAfjGhB1k2tE2dkG12sd1Ff1A1fj2fH2Y1j1fKJl2f1sD1ON275zJNUy...  
 code = dAfj!hB1k2tE2dkG12sd1Ff1A1fj2fH2Y1j1fKJl2f1sD1ON275zJNUy...  
 division = 123456  
 refresh_token = SDFu!12SAah-un-56su-1fj2fH2Y1j1fKJl2f1sDfKJl2f1sD11FfUn1...  

I changed the server part to match the Belgian Exact Online:

 [server]  
 auth_url = https://start.exactonline.be/api/oauth2/auth  
 rest_url = https://start.exactonline.be/api  
 token_url = https://start.exactonline.be/api/oauth2/token  

In the "Application" part, mind the incorrect curly braces (client_id). I wasted some time looking for this error. Here is the correct way:

 [application]  
 base_url = https://app.getpostman.com/oauth2/callback  
 client_id = 5d999999-9999-9999-9999-999999999761  
 client_secret = vL********Ky  
 iteration_limit = 50  

And the last part. Put the access_token and the refresh_token inplace.
The division you can find by browsing to: https://start.exactonline.be/docs/XMLDivisions.aspx (Do this while you are logged in at Exact Online (https://start.exactonline.be).

 [transient]  
 access_token = gAAAAJ0Tfk9999999999999999999sOFJ6ESyLhWnTIlMvOvsHwJ-99999999999999999999wpw8q_UikFez3GcLVpiYPTLOQ12f6scck6O0h1Bk8TWSB1naDpNcEG9KtfIB9999999999999999999999999999999999999999999999999999999999999999999999999999999999999999_H5YiUjK0zkmAEaXyGcbqxgYVBLtgReiS-elZEllm9tnI2iyeNiL8nGrlzRVyD9Ev6_ejqlfYKBopI1tb2lAndz54tNuaif3-r84CQ91N4LjvlLO6T8kg8AE9MB4RnSD4Z5R97QDVH2pQlmsRVmTC7jKTXaH4MH_B-89FxmZq7pp_d9GGg6-QBEYTRHWfoTJJfApZxPRGP9yjhYJTJf4fjf5MlQhOo3DlPNKO5gJQCy0_YNMwA688L0fnkyo16Hcj-Hp4wsMuPOiuBEcXQI4MH68idj58Z2DVt2w0dBNM_R8RbA3wJEQ_dowW6owLlJACOX8Dt_M1zcZzOnIlwg94Z4o9999999999999999999999999999999999999999999999999999999999999999999999999999999999999990YM  
 division = 425880  
 refresh_token = O4D999999999999999999999999999999999999999999999999999999999999999999985liyY9HzVZ3w0lrgqhdjqwU-bDD-5NsNanWG_LDm3_jCW6sAhDXvpzlB8KGbKpTNEPgIFm9DwBFuHhocdTZ7Fzt4UHp-C4KmTRMM1s8v5v8BtcZfqbAKKV14mX9PoOahQ2E2GFhrs7h4cqESHHdvYLOdui3vzcndGsLLT3P-YJd52P4iTWtKmAi-l2t3NWKX3HQYSQGRXjQcS_dFeTV0ZH5L979UJ99999999999999999999999999999999999999999999999999999999999999999999999999999GooQ  

Save this to "config.ini"

Everything should be allright now. Try following code (change the path to the ini file):

 from exactonline.api import ExactApi  
 from exactonline.exceptions import ObjectDoesNotExist  
 from exactonline.resource import GET, POST, PUT, DELETE  
 from exactonline.storage.ini import IniStorage  
   
 # Create a function to get the api with your own storage backend.  
 def get_api():  
   storage = IniStorage('c:/Python27/exact/config.ini')  
   return ExactApi(storage=storage)  
 api = get_api()  
   
 relations = api.relations.filter(top=100)  
 print(relations)  
   

This is the start. The ini file will be automatically refreshed with new tokens as they expire.

Whenever you need to use this in the client's production evironment, you can create the same tokens with their credentials. Also change the devision.

Drop me a line if you need more code.